
When Karpathy vibe coded a web app from scratch about a year ago, he observed that the hardest part wasn’t the code. It was everything around it: services, auth, database, deployment. Recently he put it this way:
The entire DevOps lifecycle has to become code […] with agent-native ergonomics.
He also noted that this “requires from-scratch re-design.” We agree. There are great platforms out there, but most were designed for humans clicking through dashboards. That’s why we built Specific from the ground up to be used by coding agents. Everything the agent needs to build and deploy an app lives in a single config file it can read and write.
To see what that looks like in practice, let’s build a Linear-style task board from scratch. One layer at a time, using nothing but Claude Code prompts. To be fair, not every step along the way was a clean one-shot although it might look like it. The agent got the infrastructure right every time, but hit some edge cases in the application code that I had to help it work through.
Here’s the plan:
- Frontend: Build and deploy a task board UI
- Backend: Add a Go API and wire it to the frontend
- Database: Add Postgres for persistent storage
- Authentication: Add Google OAuth
- Real-time sync: Live updates across clients
- File storage: S3-compatible file attachments
- Background jobs: Durable workflows with Temporal
Part 1: Frontend
Before writing any code, we install the Specific CLI:
curl -fsSL https://specific.dev/install.sh | shNow let’s initialize Specific in a new directory:
specific initThis asks which coding agent you’re using (Claude Code, Codex, Cursor, etc.) and sets things up so the agent always knows about Specific.
For Claude Code, it adds a CLAUDE.md telling the agent to use Specific for all infrastructure and to read the CLI docs. It also configures permissions so specific commands run without asking for approval every time.
Let’s start simple by telling Claude Code what we want. For the sake of the demo, I pre-filled my CLAUDE.md file so it creates a React app with Vite, Tailwind, and shadcn.
Prompt: Build a task board app with 3 columns: To Do, In Progress, Done. Add example tasks with title, descriptions and tags.
The interesting thing here isn’t the frontend itself. It’s the specific.hcl file that Claude Code writes alongside it. This is how Specific knows what to build and how to run it. Here’s what that looks like for our frontend:
build "web" {
  base    = "node"
  command = "npm run build"
}

service "web" {
  build   = build.web
  command = "npx serve dist -s -l $PORT"

  endpoint {
    public = true
  }

  env = {
    PORT = port
  }

  dev {
    command = "npx vite --port $PORT"
  }
}
build "web" tells Specific how to package the app. base = "node" picks a preset Node.js environment, which covers most cases. For anything more custom, you can point to your own Dockerfile instead, and the agent knows how to use both. command is what produces the build artifacts.
service "web" tells Specific how to run it. It references the build above, sets a start command, and exposes a public endpoint with public = true. Services are internal by default, so you have to explicitly opt in to public access, which gives you a Specific-managed URL like beautiful-kangaroo.spcf.app. SSL certificates are provisioned and renewed automatically. The env block gives the service a PORT variable. port is a special Specific value that allocates an available port automatically.
dev overrides the production command for local development. Instead of serving a static build, we get the Vite dev server with hot reload.
Before running anything, Claude Code runs specific check. Remember, specific init set things up so the agent knows to do this after every config change. Think of it as a linter for your infrastructure: it validates the HCL syntax, checks that referenced files exist, and validates database migrations. If the agent wrote something wrong, it finds out immediately and fixes it.
Once that passes: specific dev and the app is live locally. specific deploy and it’s live in production in our secure and scalable cloud. Run these commands yourself, or let your agent do it for you. The nice thing about letting your agent do it is that the feedback loop is instant. If something goes wrong when starting the dev server or deploying your app, it immediately gets the feedback it needs to make adjustments.
The app works, but the data is hardcoded. Let's fix that.
Part 2: Backend
Now Specific starts to matter. Claude Code can write a Go API, that’s straightforward nowadays. The interesting part is how we wire the two services together.
Without Specific, you’d be managing environment variables manually to tell the frontend where the API lives, making sure the values are different in dev and production. With Specific, we use a service reference (service.api.public_url) that resolves to the right address automatically.
Prompt: Add a Go API backend service. Move the task data to the API and have the frontend fetch from it.
Here’s how the config file changes:
 build "web" {
   base    = "node"
   command = "npm run build"
+
+  env = {
+    VITE_API_URL = "https://${service.api.public_url}"
+  }
 }

 service "web" {
   # ...
   dev {
     command = "npx vite --port $PORT"
+    env = {
+      VITE_API_URL = "http://${service.api.public_url}"
+    }
   }
 }

+build "api" {
+  base    = "go"
+  root    = "api"
+  command = "go build -o api"
+}
+
+service "api" {
+  build   = build.api
+  command = "./api"
+
+  endpoint {
+    public = true
+  }
+
+  env = {
+    PORT = port
+  }
+
+  dev {
+    command = "go run ."
+  }
+}
We added a new build and service block for the API. The root = "api" field tells Specific the Go code lives in a subdirectory.
On the frontend side, Vite needs the API URL at build time (it inlines env variables into the bundle), so we set VITE_API_URL in the build block. It’s also in the dev block because Vite’s dev server picks it up from the process environment directly, and we need the http:// override there.
The API endpoint also has public = true because the frontend needs to reach it from the browser. If a service should only talk to other services (say, an internal microservice), you’d leave out public and use private_url instead.
The app works. But the tasks are not persisted.
Part 3: Database
Adding a database usually means installing Postgres locally, provisioning a hosted instance, copying connection strings into env files, and making sure it all matches. In Specific, it’s one block.
Prompt: Replace the in-memory task data with a database
Here’s what that looks like in Specific:
 service "api" {
   # ...
   env = {
     PORT         = port
+    DATABASE_URL = postgres.main.url
   }
 }

+postgres "main" {
+  reshape {
+    enabled = true
+  }
+}
That's it. Locally, Specific runs a real Postgres instance using bundled binaries. No Docker, no manual install. In production, it provisions a managed database through Neon. We chose Neon for scale-to-zero and branching, which lets us spin up isolated preview environments with real data (more on that here).
The reshape block enables Reshape, a zero-downtime schema migration tool for Postgres. Unlike ORM-specific migration tools, Reshape works with any language. It keeps both old and new schemas available during a migration so you can roll out gradually, and avoids excessive locking so your database stays responsive (intro blog post).
Specific also works with ORM migration tools like Drizzle or Prisma. You'd remove the reshape block, generate migrations through your ORM, and add a pre-deploy hook to run them in production. It works, but with Reshape all of that is handled automatically.
Here’s the Reshape migration Claude Code creates:
# migrations/001_create_tasks.toml
[[actions]]
type = "create_table"
name = "tasks"
primary_key = ["id"]

  [[actions.columns]]
  name = "id"
  type = "INTEGER"
  generated = "ALWAYS AS IDENTITY"

  [[actions.columns]]
  name = "title"
  type = "TEXT"
  nullable = false

  [[actions.columns]]
  name = "description"
  type = "TEXT"
  default = "''"

  [[actions.columns]]
  name = "status"
  type = "TEXT"
  nullable = false

  [[actions.columns]]
  name = "tags"
  type = "JSONB"
  default = "'[]'"
No migration scripts to run manually. specific check validates the migration files (on top of the config), and Reshape applies them automatically when we start specific dev. If the agent writes an invalid migration, specific check catches it and the agent can read specific docs to fix it.
Data persists now. But anyone can see everyone’s tasks, so we need users.
Part 4: Authentication
Let's support users by adding authentication with Google. For this demo, I went with Go's official golang.org/x/oauth2 library and simple JWT sessions. It's a minimal approach, but it gets the job done. If you want something more full-featured while still owning your data, Better Auth is a great choice for TypeScript projects. Managed providers like WorkOS or Clerk are also easy to integrate. The pattern in Specific is the same either way: declare the keys as secrets, inject them as env vars.
Prompt: Add authentication with Google Auth. Associate tasks with users.
Here’s what the config looks like now:
+secret "google_client_id" {}
+secret "google_client_secret" {}
+
+secret "jwt_secret" {
+  generated = true
+}

 service "api" {
   # ...
   env = {
     PORT                 = port
     DATABASE_URL         = postgres.main.url
+    GOOGLE_CLIENT_ID     = secret.google_client_id
+    GOOGLE_CLIENT_SECRET = secret.google_client_secret
+    JWT_SECRET           = secret.jwt_secret
+    WEB_URL              = "https://${service.web.public_url}"
+    API_URL              = "https://${service.api.public_url}"
   }

   dev {
     command = "go run ."
+    env = {
+      WEB_URL = "http://${service.web.public_url}"
+      API_URL = "http://${service.api.public_url}"
+    }
   }
 }
There are two kinds of secrets here. Generated secrets like jwt_secret just need to exist as a random, secure value. Setting generated = true tells Specific to create and manage it automatically. We never need to see or set it. Manual secrets like the Google OAuth credentials come from an external provider.
We don’t have to remember where to put the value of the secrets. If a secret is missing when we run specific dev or specific deploy, Specific prompts us for the value before anything starts. No more discovering a missing key from a cryptic error in the logs halfway through. The values end up in a file called specific.local for dev, and can be managed through the Specific dashboard for production.
Specific also supports config blocks for non-sensitive values like log levels or feature flags. Same pattern, but the values aren’t hidden. We don’t need any for this project, but it’s there when you do.
Claude Code also creates new migration files for the users table. Reshape picks them up automatically, just like before.
We have users and data now. But open the board in two browser windows. Add a task in one, and the other doesn’t update. Let’s fix that.
Part 5: Real-time sync
Specific has built-in support for real-time sync through ElectricSQL, and adding it takes two lines in the config.
Prompt: Make the task board realtime. When a task is added or updated, all clients should see it instantly
Here’s what Claude Code adds to the config:
 service "api" {
   # ...
   env = {
     PORT                 = port
     DATABASE_URL         = postgres.main.url
+    DATABASE_SYNC_URL    = postgres.main.sync.url
+    DATABASE_SYNC_SECRET = postgres.main.sync.secret
     GOOGLE_CLIENT_ID     = secret.google_client_id
     # ...
   }
 }
Specific sees the sync references and automatically runs an Electric instance alongside our Postgres in dev, and connects to the managed sync service in production.
What makes Electric interesting is how it works under the hood. Instead of running a pub/sub layer on top of the database and pushing events over WebSockets, it reads directly from the Postgres replication stream and serves changes over plain HTTP. And since it just speaks HTTP and JSON, it works with any language or framework.
On the code side, Claude Code adds a proxy endpoint in the Go API and hooks up the Electric client SDK on the frontend. The proxy is there so the API can handle auth and define which subset of data each user syncs (Electric calls these “shapes”), rather than exposing the sync engine directly to the browser.
Open the app in two browser windows, add a task in one, and watch it appear in the other instantly.
The app feels real now. But let’s not stop there. Let’s add file attachments to tasks.
Part 6: File storage
File storage is a common need, but getting a consistent setup across local development and production is usually more work than it should be. Specific supports S3-compatible object storage that works the same in both. Let's add file attachments to tasks:
Prompt: Add file attachments to tasks. Adding/deleting should be synced in realtime to all clients
 service "api" {
   # ...
   env = {
     # ...
+    S3_ENDPOINT   = storage.attachments.endpoint
+    S3_ACCESS_KEY = storage.attachments.access_key
+    S3_SECRET_KEY = storage.attachments.secret_key
+    S3_BUCKET     = storage.attachments.bucket
   }
 }

+storage "attachments" {}
One storage block and four env vars. Claude Code adds upload endpoints to the Go API using minio-go (an S3-compatible client) and a file attachment UI on task cards.
It also creates a new migration for the attachments table (again, Reshape handles it automatically) and updates the sync proxy so attachments show up instantly for all connected clients.
Specific runs a real S3-compatible server locally. The same code that uploads files in development works identically in production through Tigris. We chose Tigris for the same reasons we chose Neon: features like forking and snapshotting make it easy to spin up preview environments with real data but fully isolated. It’s also globally distributed, so storage stays close to your users.
We can upload files now, but what if we want something to happen asynchronously after the upload?
Part 7: Background jobs
Specific has built-in support for Temporal, a durable workflow engine that's open source and battle-tested at scale, with SDKs for Go, TypeScript, Python, and more. Let's use it to generate thumbnails for image attachments. It's admittedly overkill for a task board, but in a real app you'd use this for things like sending emails, processing payments, or running AI pipelines.
Prompt: Add image thumbnail generation for attachments using Temporal background jobs. Show thumbnails in the task cards, with a loading placeholder while the thumbnail is being generated.
+temporal "jobs" {}

 service "api" {
   # ...
   env = {
     # ...
+    TEMPORAL_ADDRESS   = temporal.jobs.url
+    TEMPORAL_NAMESPACE = temporal.jobs.namespace
+    TEMPORAL_API_KEY   = temporal.jobs.api_key
   }
 }

+build "worker" {
+  base    = "go"
+  root    = "worker"
+  command = "go build -o worker"
+}
+
+service "worker" {
+  build   = build.worker
+  command = "./worker"
+
+  env = {
+    TEMPORAL_ADDRESS   = temporal.jobs.url
+    TEMPORAL_NAMESPACE = temporal.jobs.namespace
+    TEMPORAL_API_KEY   = temporal.jobs.api_key
+    DATABASE_URL       = postgres.main.url
+    S3_ENDPOINT        = storage.attachments.endpoint
+    S3_ACCESS_KEY      = storage.attachments.access_key
+    S3_SECRET_KEY      = storage.attachments.secret_key
+    S3_BUCKET          = storage.attachments.bucket
+  }
+
+  dev {
+    command = "go run ."
+  }
+}
The worker is a separate service with no public endpoint. It has access to Temporal, the database, and storage, but it’s not reachable from the internet. The API service dispatches workflows, the worker picks them up.
Locally, specific dev downloads and starts a Temporal dev server automatically, with a web UI for inspecting workflows. In production, specific deploy provisions a managed Temporal Cloud namespace. No manual setup, no environment-specific config. The same three env vars resolve to the right values everywhere.
The final product
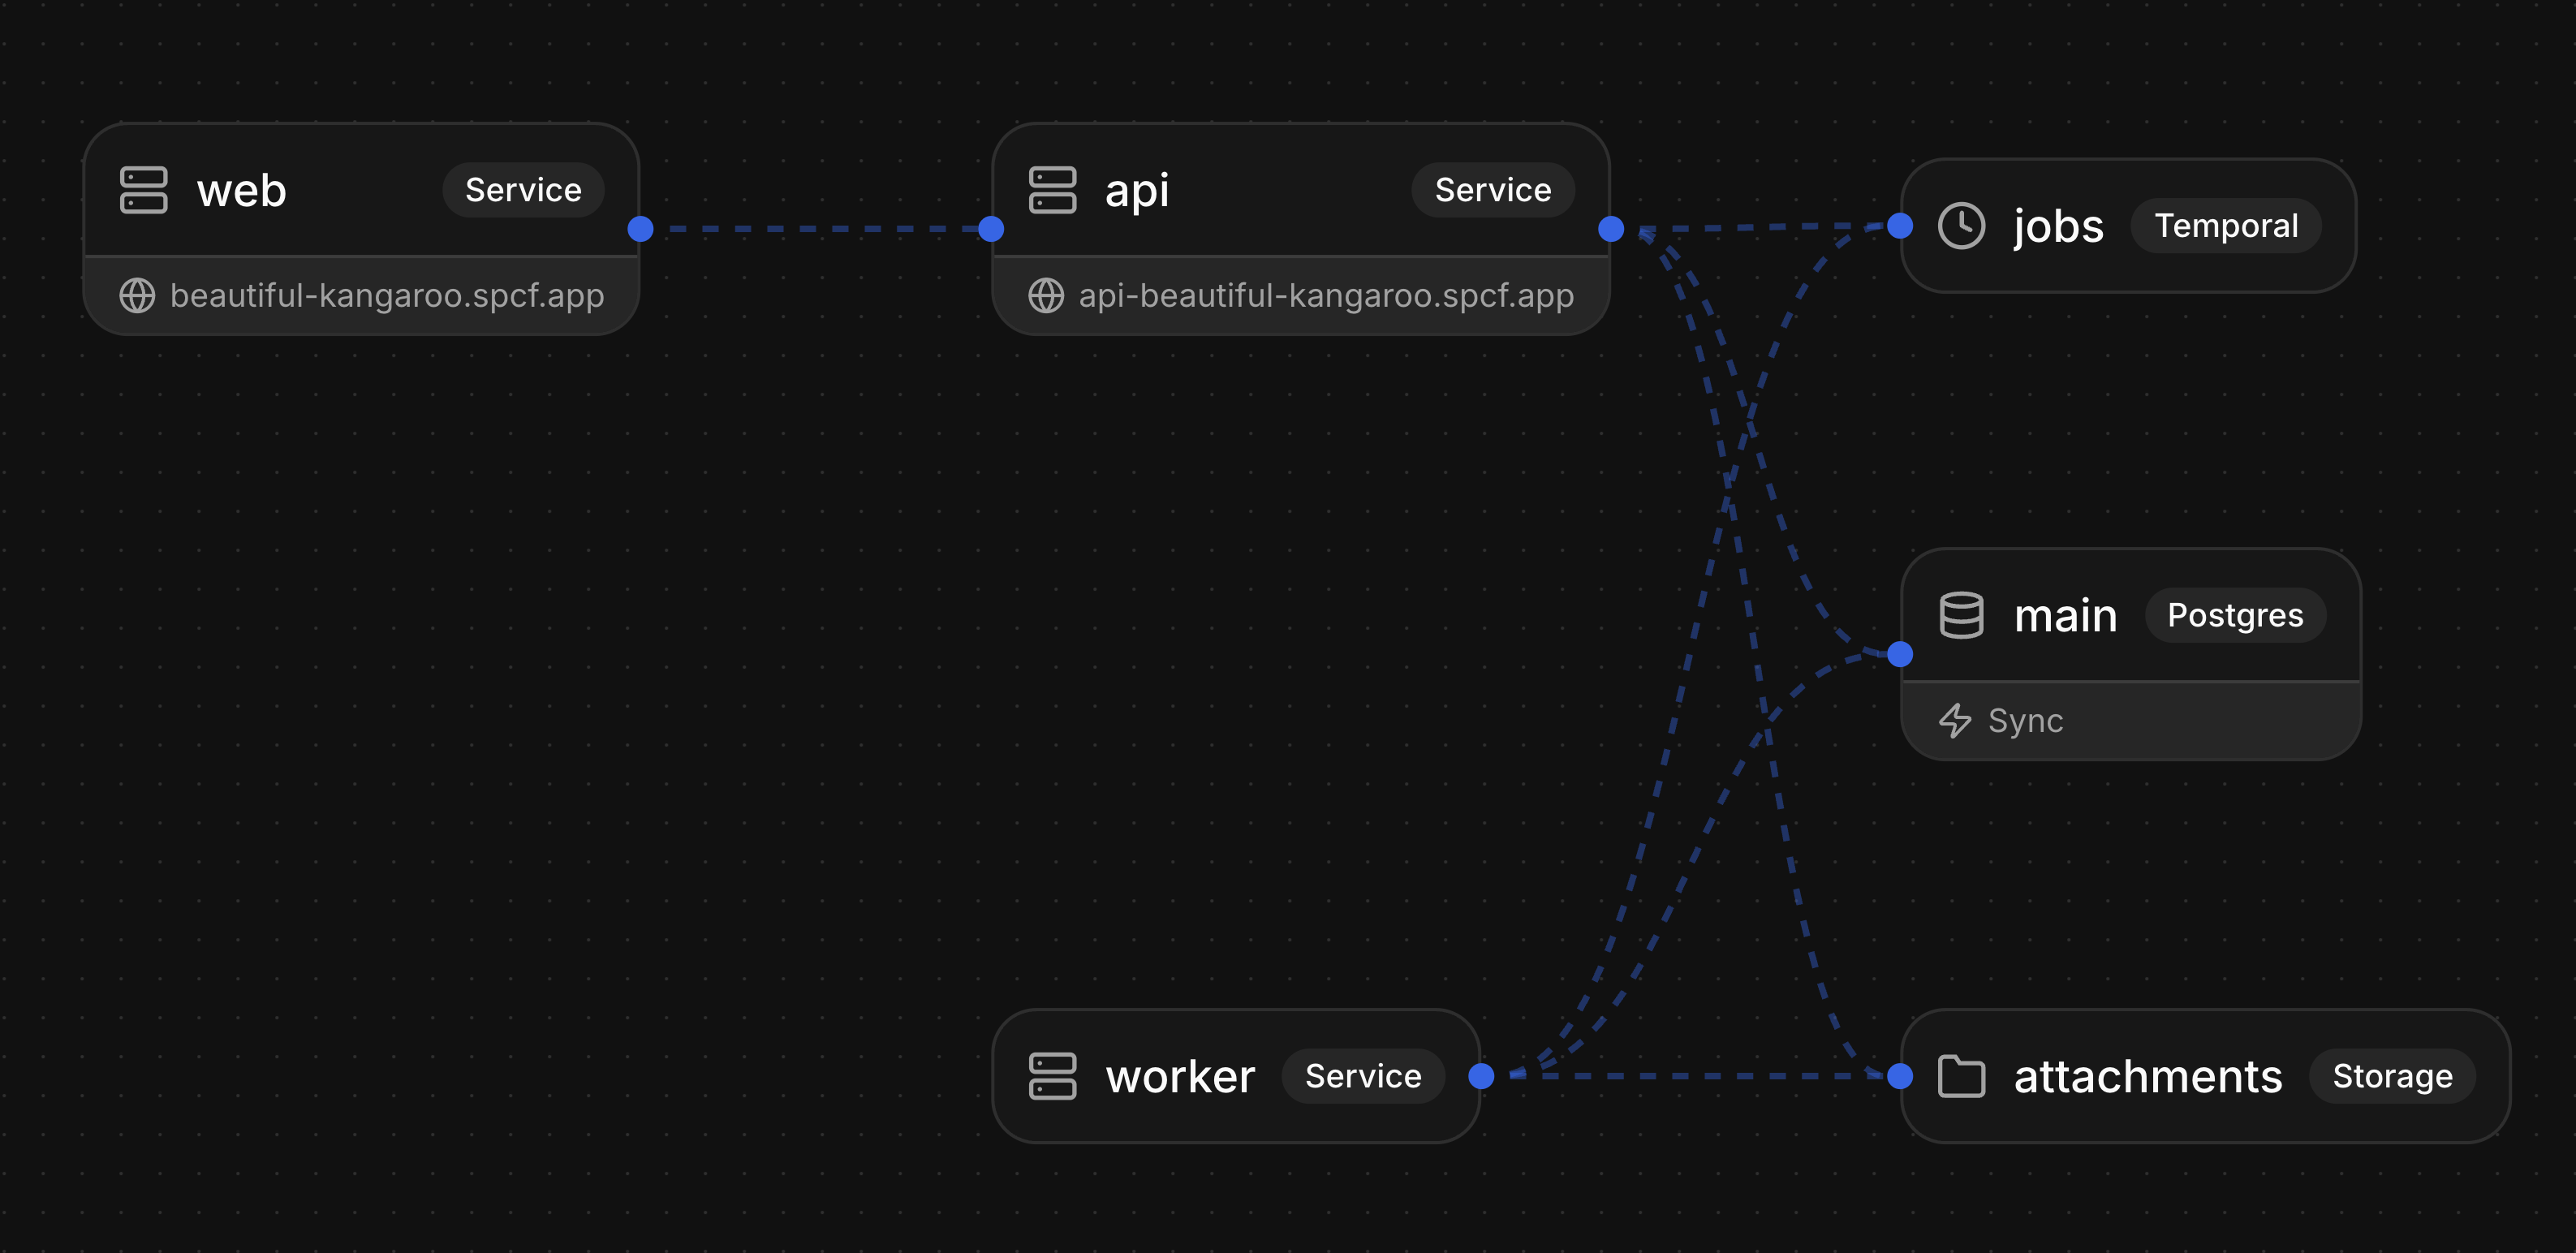
We built a real-time collaborative task board with authentication, persistent storage, file attachments, and background jobs. Three services (frontend, API, worker), a database, a sync engine, object storage, and a workflow engine. All in one config file.
Log in with Google, and you’re on your own board. Create a task, drag it between columns, attach a file. Open a second browser window and watch changes appear instantly. Upload an image and a thumbnail generates in the background. Everything you’d expect from a production app.
While the agent handles building and deploying through the CLI, the Specific dashboard is there for managing everything else: logs, database viewer, file storage, workflow monitoring, scaling services, and managing secrets and plans.
Try the live app. The full source code is on GitHub.
Start building yourself
Try Specific yourself by giving your agent the following prompt:
Help me get started with Specific by following: https://docs.specific.dev/for-ai/onboardingAlternatively, run the following command to install the CLI:
curl -fsSL https://specific.dev/install.sh | shAfter that, run specific init in your project directory and start prompting with your favorite coding agent.
We’re working on a lot more features and would love to hear from you at [email protected]. And if you want to help build this, check out specific.dev/careers.